Automatically generate music previews from Spotify

Today, we'll utilize Zapier to blend Transloadit and Spotify to quickly create a track preview. We have a few other Zapier posts now, but since I'm a big music fan, I jumped at the idea of covering this this topic in a blog post. Plus, this gives us another opportunity to cover some extra bases.
To follow along, you will require a premium Zapier account as we'll be using multiple Steps.

Creating our Template
We need a Template that will take two URLs provided by our Zap that contain album artwork and a track. These will be merged, leaving us with a result that displays the album cover alongside a thirty-second song clip before being exported to our S3 bucket.
Copy the JSON below to achieve the described output.
{
  "steps": {
    "import_audio": {
      "robot": "/http/import",
      "url": "${fields.audio}"
    },
    "import_artwork": {
      "robot": "/http/import",
      "url": "${fields.artwork}"
    },
    "merged": {
      "robot": "/video/merge",
      "use": {
        "steps": [
          {
            "name": "import_audio",
            "as": "audio"
          },
          {
            "name": "import_artwork",
            "as": "image"
          }
        ]
      },
      "result": true,
      "ffmpeg_stack": "v6.0.0",
      "preset": "ipad-high",
      "height": 635,
      "width": 640
    },
    "exported": {
      "robot": "/s3/store",
      "use": "merged",
      "result": true,
      "credentials": "s3defaultBucket",
      "path": "spotify/merged/${file.name}"
    }
  }
}
Setting up Zapier
Inside Zapier, create a Zap with Spotify with the trigger set to New Saved Track. This causes our Zap to run whenever we save a song. You can, if you prefer, use one of the alternative triggers.
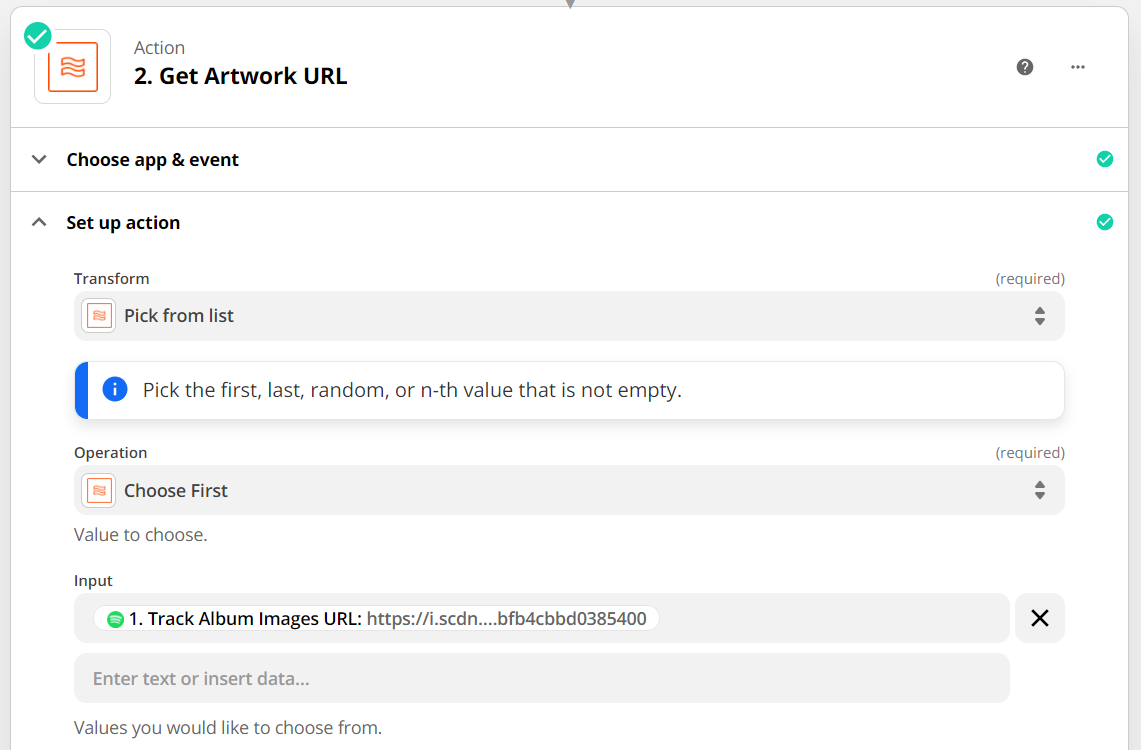
Spotify provides us with a list of URLs that point to your track's album cover (with varying resolutions), so the following action needs to be Format. Set the action type to Utilities, then set the Transform to Pick From List. Lastly, set the Operation to Choose First. This will take the highest-resolution album cover for our preview.
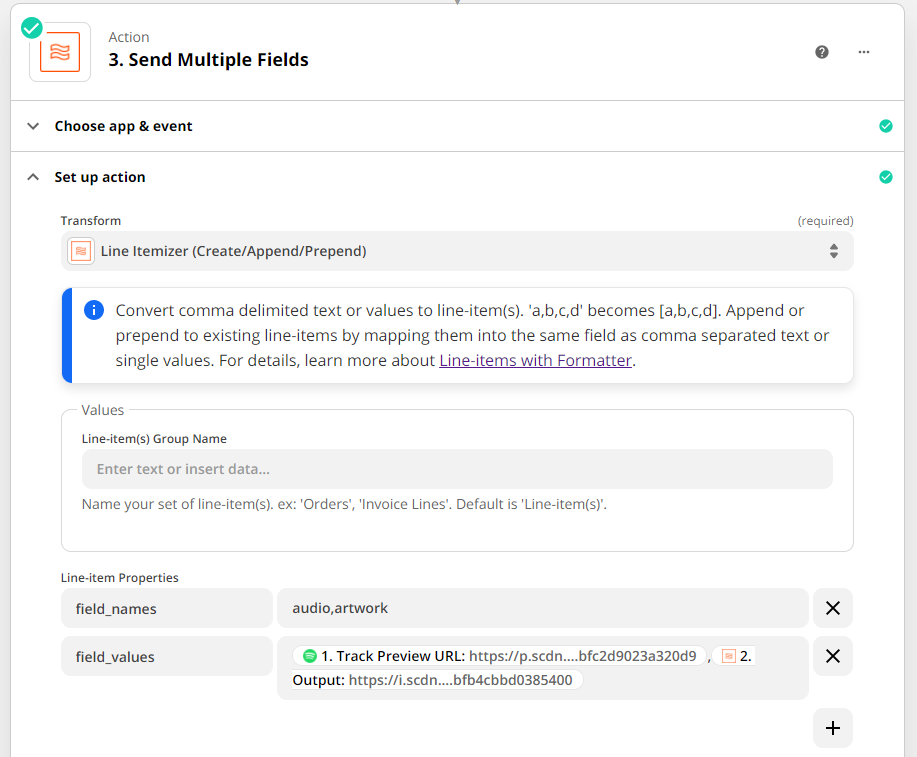
Next, we need to send multiple fields to Transloadit. To do this, we'll be using the approach detailed in this blog post by my fellow Transloadian, Yukesh. Check it out if you're looking to learn more about our method here!
Create another Format action, with the type set to Utilities. This time, however, set Transform to Line Itemizer. This allows us to create a comma-separated list of values to be sent as our uploaded fields.
Create two properties called field_names and field_values. Set field_names to audio and
artwork, and field_values to the track preview URL from the first Step and the output
from our second Step.
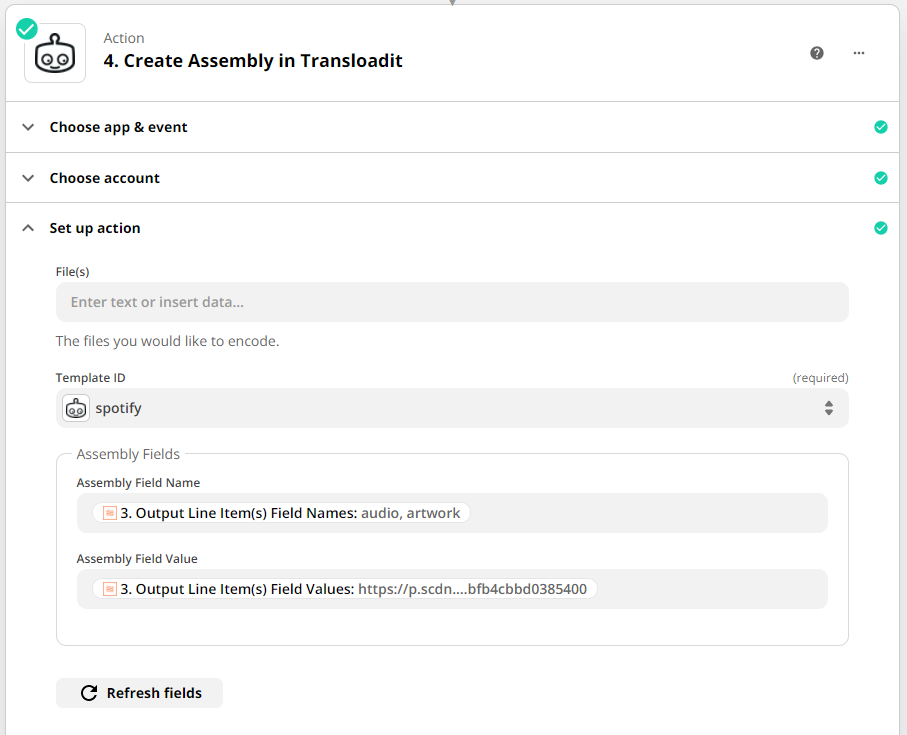
The final step in our Zap uses Transloadit to create an Assembly. Connect your
Transloadit account, then apply the Template we created earlier. Set the Assembly Field
Name to field_names from the previous Step and the Assembly Field Value to
field_values.
Testing
When testing your Zap, you will see a new Assembly has run. Looking inside your S3 bucket, you will see an uploaded file containing a track preview of the song you most recently liked. In my case, it was Life During Wartime by the Talking Heads.
That concludes this blog post! We hope it has further demonstrated the breadth of Transloadit's capabilities and provided you with inspiration for your next project. Please share some of your new ideas, as well as some of your recently discovered tunes 🎵