Transloadit launches Turbo Mode for faster video encoding

What if I told you there is an even faster way to encode your videos? If there is already a smile forming on your face, I promise not to disappoint you with what you are going to read next. One of the latest things we have come up with here at Transloadit is "Turbo Mode". This new feature will help you to drastically cut down on video encoding time. In the next couple of sections, we'll be going through various tests and results to show you all about it.

Primer
Before we get started with the tests, it's important to familiarize yourself with our /http/import Robot, which we will use to import the original video files. There are many other ways to get files to Transloadit, but in this tutorial, we're importing files that are publicly available via a URL. The code block below shows an example of how to use it.
{
  "imported": {
    "robot": "/http/import",
    "url": "https://file.com/video.mp4"
  }
}
We will then pass the imported files to our video encoding Robots.
We will be using five different-sized video files to test our Turbo Mode:
video-XS.mp4- 10MB in size.video-S.mp4- 34MB in size.video-M.mp4- 260MB in size.video-L.mp4- 1.2GB in size.video-XL.mp4- 6.4GB in size.
Now, these aren't scientific benchmarks, it's just me running the encoding three times each and taking the average time, but it should provide a basic feel for the impact of Turbo Mode across different video file sizes.
Benchmark 1 - Comparing 720p WebM normal encoding vs. Turbo Mode
Let's take a look at the Template below:
{
  "steps": {
    "imported": {
      "robot": "/http/import",
      "url": "https://example.com/files/video.mp4"
    },
    "webm_720p_encoded": {
      "use": "imported",
      "robot": "/video/encode",
      "result": true,
      "ffmpeg_stack": "v6.0.0",
      "preset": "webm",
      "width": 1280,
      "height": 720
    },
    "exported": {
      "use": "webm_720p_encoded",
      "robot": "/s3/store",
      "credentials": "s3_cred"
    }
  }
}
In the Template above, we are first using the /http/import Robot to import a
file, then having the /video/encode Robot encode the video using the webm preset,
before we export the results to Amazon S3.
Now we'll have to run these tests again for each of the five video files we selected in the Primer. After doing this, we will note down the time differences.
I'm using the Node.js SDK to spawn Assemblies, but you could just as well try this live on the Transloadit website under your account, or use one of our many other SDKs.
Next, we move ahead to repeat the same process for the same URL again, but this time adding
turbo: true to the /video/encode Step, thereby
activating Turbo Mode.
Our Template would look like this for the Turbo Mode:
{
  "steps": {
    "imported": {
      "robot": "/http/import",
      "url": "https://example.com/files/video-S.mp4"
    },
    "webm_720p_encoded": {
      "use": "imported",
      "robot": "/video/encode",
      "result": true,
      "ffmpeg_stack": "v6.0.0",
      "preset": "webm",
      "width": 1280,
      "height": 720,
      "turbo": true
    },
    "exported": {
      "use": "webm_720p_encoded",
      "robot": "/s3/store",
      "credentials": "s3_cred"
    }
  }
}
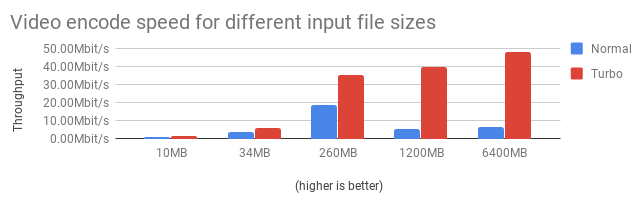
After running the tests for these two scenarios, we arrived at the following scoresheet:
| File | File Size | Normal Duration | With Turbo Mode | Speed Increase |
|---|---|---|---|---|
video-XS.mp4 |
10MB | 00:01:14 | 00:00:49 | 33.78% |
video-S.mp4 |
34MB | 00:01:13 | 00:00:45 | 38.36% |
video-M.mp4 |
260MB | 00:01:51 | 00:00:41 | 63.06% |
video-L.mp4 |
1.2GB | 00:29:41 | 00:04:01 | 86.47% |
video-XL.mp4 |
6.4GB | 02:07:02 | 00:17:42 | 86.09% |
{ .table .Post-table .table-responsive}
As you see, for regular video Encoding Jobs, we're obliterating encoding times across the board. 😱🏎
Below is a graph which further explains our findings:
Benchmark 2 - Comparing HLS normal encoding vs. Turbo Mode
Let us now take a look at the following Template:
{
  "steps": {
    "imported": {
      "robot": "/http/import",
      "url": "https://example.com/files/video-S.mp4"
    },
    "360p_hls_encoded": {
      "use": "imported",
      "robot": "/video/encode",
      "ffmpeg_stack": "v6.0.0",
      "preset": "hls-360p"
    },
    "hls_bundled": {
      "use": {
        "steps": ["360p_hls_encoded"],
        "bundle_steps": true
      },
      "robot": "/video/adaptive",
      "ffmpeg_stack": "v6.0.0",
      "playlist_name": "my_playlist.m3u8",
      "technique": "hls"
    },
    "exported": {
      "use": "hls_bundled",
      "robot": "/s3/store",
      "credentials": "s3_cred"
    }
  }
}
In the Template above, just like when we were encoding for the webm format, we are
using the /http/import Robot to import a file, then having the /video/encode
Robot encode it in order to prepare segments for the /video/adaptive Robot.
And then we export all results to Amazon S3.
And again, we'll have to run the test for all five of our files.
Next, we'll move ahead and repeat the same process again for all of the videos, but this time, one
of our Steps has turbo: true in it:
{
  "steps": {
    "imported": {
      "robot": "/http/import",
      "url": "https://example.com/files/video-S.mp4"
    },
    "360p_hls_encoded": {
      "use": "imported",
      "robot": "/video/encode",
      "ffmpeg_stack": "v6.0.0",
      "turbo": true,
      "preset": "hls-360p"
    },
    "hls_bundled": {
      "use": {
        "steps": ["360p_hls_encoded"],
        "bundle_steps": true
      },
      "robot": "/video/adaptive",
      "ffmpeg_stack": "v6.0.0",
      "playlist_name": "my_playlist.m3u8",
      "technique": "hls"
    },
    "exported": {
      "use": "hls_bundled",
      "robot": "/s3/store",
      "credentials": "s3_cred"
    }
  }
}
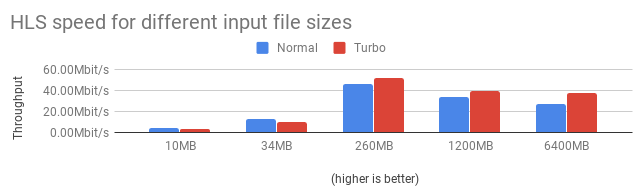
We are now getting some interesting results in the scoresheet:
| File | File Size | Normal Duration | With Turbo Mode | Speed Increase |
|---|---|---|---|---|
video-XS.mp4 |
10MB | 00:00:19 | 00:00:25 | -31.58% |
video-S.mp4 |
34MB | 00:00:21 | 00:00:28 | -33.33% |
video-M.mp4 |
260MB | 00:00:45 | 00:00:40 | 11.11% |
video-L.mp4 |
1.2GB | 00:04:43 | 00:04:05 | 13.43% |
video-XL.mp4 |
6.4GB | 00:32:12 | 00:23:01 | 28.52% |
{ .table .Post-table .table-responsive}
As you can see, for the first file – which happened to be 10MB in size – there was a 31.58% increase in encoding time. This is because the file was too small for it to be chunked, and as such, the additional overheads that Turbo Mode imposes were picked up for no reason.
Similarly, for the second file, which is 34MB, we had a 33.33% increase in encoding time. Interestingly, however, the 260MB file saw a gain of about 11.11% in encoding time. And as expected, for the fourth and fifth file, encoding times also improved by 13.43% and 28.52% respectively.
So, it is clear that the larger the file, the more speed we gain when encoding for HTTP Live Streaming (HLS).
This graph further explains the findings:
Benchmark 3 - Comparing MPEG-dash normal encoding vs. Turbo Mode
For our final test, let's take a look at this Template:
{
  "steps": {
    "imported": {
      "robot": "/http/import",
      "url": "https://example.com/files/video-S.mp4"
    },
    "360p_dash_encoded": {
      "use": "imported",
      "robot": "/video/encode",
      "ffmpeg_stack": "v6.0.0",
      "preset": "dash-360p-video"
    },
    "dash_bundled": {
      "use": {
        "steps": ["360p_dash_encoded"],
        "bundle_steps": true
      },
      "robot": "/video/adaptive",
      "ffmpeg_stack": "v6.0.0",
      "playlist_name": "my_playlist.mpd",
      "technique": "dash"
    },
    "exported": {
      "use": "dash_bundled",
      "robot": "/s3/store",
      "credentials": "s3_cred"
    }
  }
}
Compared to the previous Template for HLS, all we had to do is use a dash preset in the
/video/encode Step, and switch the technique used by the /video/adaptive
Robot to dash.
Again, for the Turbo Mode tests simply add turbo: true to the /video/encode Step.
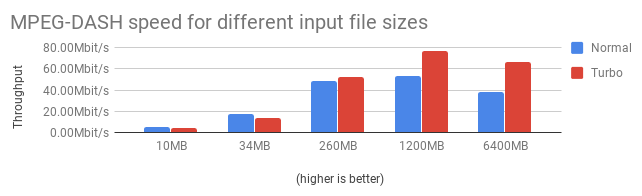
After running all tests, we get the following results:
| File | File Size | Normal Duration | With Turbo Mode | Speed Increase |
|---|---|---|---|---|
video-XS.mp4 |
10MB | 00:00:15 | 00:00:19 | -26.67% |
video-S.mp4 |
34MB | 00:00:16 | 00:00:20 | -25% |
video-M.mp4 |
260MB | 00:00:43 | 00:00:40 | 6.98% |
video-L.mp4 |
1.2GB | 00:02:59 | 00:02:04 | 30.73% |
video-XL.mp4 |
6.4GB | 00:22:29 | 00:12:51 | 42.85% |
{ .table .Post-table .table-responsive}
As expected (because HLS and DASH are very similar technologies), we're seeing a loss of speed for smaller files. It's only after the ~200MB mark that we start to see a speed increase.
The graph below further explains these findings:
Benchmark conclusion
The various tests above have demonstrated how much time you can save by using Turbo Mode. For
/video/encode Steps that aren't the input for an adaptive Step, we are
seeing speed increases across the board. When you are using adaptive streaming technologies,
however, it's wise to take file sizes into consideration.
This aligns with how Turbo Mode was built under the hood. Our API team has developed a custom algorithm that integrates with FFmpeg, allowing to distribute the workload of a single video encode job across many machines. Orchestrating the parallelization itself takes some time, but for larger files, that overhead is well worth the investment.
If you can't know filesizes upfront, you can use our /file/filter Robot to direct traffic to a Step with Turbo Mode enabled, depending on filesize.
Pricing
A lot of research and development went into creating Turbo Mode, but we are offering this upgrade to all customers free of charge (regular rates will apply). We hope your users will enjoy the speed increase as they upload their media.
What's next
In our next iteration, we'll introduce a turbo: 'auto' mode that automatically enables Turbo Mode
when we expect time savings after we have collected more data points. This will remain an opt-in
until it has seen half a petabyte worth of production usage, at which point – if we're confident
enough – we'll make turbo: 'auto' the default, and allow an opt-out via turbo: false.
In the meantime, we're inviting all of our customers to try out turbo: true for workloads that are
not mission critical and therefore expected to yield flawless results. We are welcoming any
questions, comments and concerns using our Community Forum plugin below.